Civil Dispatch allows you to add subscribers (email/SMS addresses) in to your system through several different methods. One of these methods is through a feature called Database Sync.
Database Sync allows you to directly connect to an external database to automatically import subscribers in to Civil Dispatch. Many users wish to import subscribers directly from their pre-existing website database, billing system, CMS, or many other kinds of applications and databases. Our Database Sync feature allows you to connect to external MySQL databases, MSSQL databases, or PostgreSQL databases. Database Sync will connect to your external database, and using the criteria and conditions you supply, it will find subscribers and import them in to Civil Dispatch, in to the subscriber list you choose.
Similar to the standard import feature, Database Sync will not import subscribers who have unsubscribed or bounced in the past, and if it finds a pre-existing subscriber, that subscriber will be updated or skipped, depending on your preferences.
Database Syncs can also be set up to run automatically on a schedule, so that imports can be completely automated, and new data can be transferred from your external database in to the software every week, day, hour, etc.
It is important to note that Database Sync is essentially an import function -- it will never change any data in your external database, it will only select subscribers from the external database and import them in to your Email Marketing software.
Now that you know a little bit about Database Sync, you can follow the instructions below to create a Database Sync in Civil Dispatch.
1. Create a New Database Sync
Log in to your Civil Dispatch account, and click on the Subscribers tab. If you are using version 5.1.x of Civil Dispatch, there will be a Database Sync option in the Subscribers drop-down menu. In version 5.2.x of Civil Dispatch, the Database Sync link will be on the Subscribers page, on the right side of the page, under "Advanced Options." Once you have located the Database Sync page, click the button that says "Add Sync."
2. Database Info and Basic Configuration
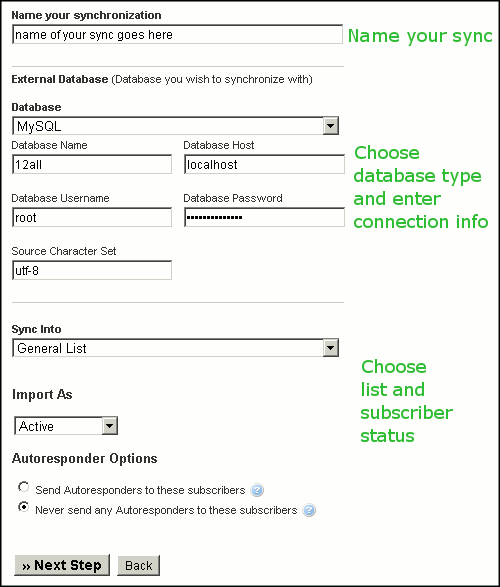
This is the first step of the process. You will see options to name your sync (this will be the name you use to reference this sync later on), choose the type of database you are connecting to, and enter in your database connection details. You will also be able to choose which list in Civil Dispatch you want to import these subscribers in to, and what the subscribers' statuses should be. If you are importing the subscribers as Active, you will also see some options pertaining to Autoresponders.
3. Choose database table
The next step of the process will connect to your database, and then show you a list of all of the tables in your database. Here you can choose the table which holds your subscriber details.
(NOTE: You will also notice that on the right, there is an option to add your own custom query. This is an advanced option that you can use if you already have a specific subscriber "SELECT" query in mind, which you want to use to select your subscriber information.)

4. Select Fields to Sync
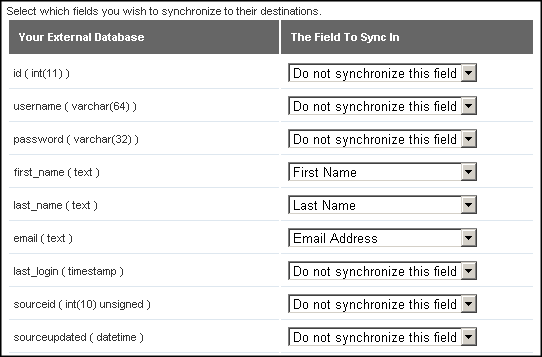
The next step will show you a list of all of the fields/columns from the table you selected in your external database. These fields are shown on the left. On the right, you will see a drop-down menu next to each field. Using this drop-down menu, choose what each field from your external databases represents in Civil Dispatch. For example, if you have a field in your external database called "email," which holds your subscribers' email addresses, make sure that that field is matched up to the "Email Address" option. If you have other data fields in your external database that you would like to import as well, such as First Name or Last Name, you can do so on this step as well. Any custom fields you have created in Civil Dispatch can be populated during Database Sync.
Please note that the only field that is required by default when syncing data using Database Sync is the "Email Address" field. If you have created other custom fields and marked them as "Required," those fields will be required during Imports and Syncs as well.
Also, please note that you cannot match up more than one field in your external database to the same field in Civil Dispatch.
5. Rules and Configuration
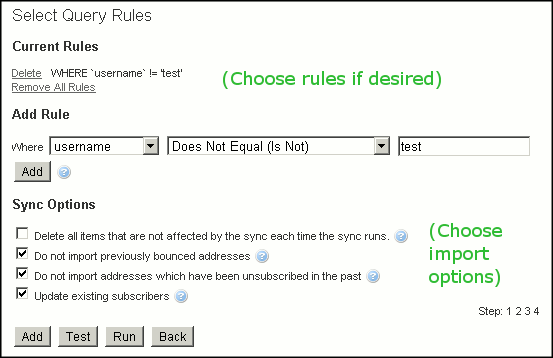
The last step allows you to create "rules" for your Database Sync. Rules are an advanced, optional feature. You can use rules to add specific logic conditions to the sync. (If you are familiar with writing database queries, the rules are what will be added as the "WHERE" part in the SELECT query. If you have already used your own custom query previously, then you will not need to add rules here.)
For example, if you only want to import subscribers from your external database where the 'id' column is greater than 1, or where 'username' is not left blank, etc, you would use the rules feature to accomplish this. You can add multiple rules to the same sync as well. In the image example below, a rule has been added saying "where username does not equal 'test'" which basically means that the sync will import all subscribers except ones where the username column in the external database equals the word "test."
Again, sync rules are optional. Most users will not need to use this feature, and if no rules are added, then all of the subscribers in the database table will be selected for the sync.
The last step of the sync process also allows you to choose specific importing options on the bottom of the page. These configuration options are exactly the same as what you would see on the Import Subscribers page, except for the "Delete all items that are not affected by the sync each time the sync runs" option. If this option is enabled, all subscribers who are present in your Civil Dispatch list, but not present in the external database, will be deleted from Civil Dispatch (Again, nothing will ever be changed or deleted from your external database.)
6. Save, Test, or Run the Sync
You're done configuring your Database Sync. Now you can click "Add" to save the sync (choose this option if you plan on running it again or running it later), or "Test" if you'd like to see how many subscribers will be synced or test the features before beginning, or simply click "Run" if you're ready to start the sync right away.
If you click "Add" to save the sync, you can return to the main Database Sync page at any time to edit, delete, or run the sync directly.
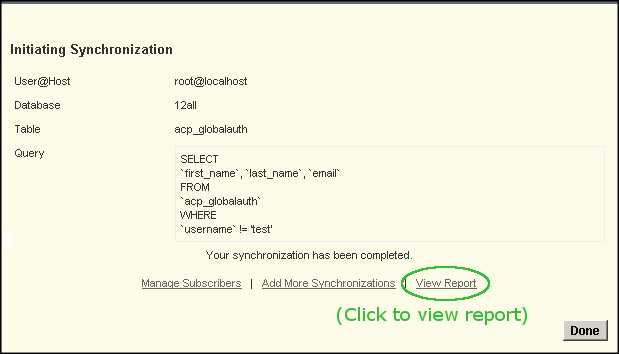
When running the sync, a pop-up module will appear that will show you the database query that is being executed, along with a progress bar to monitor the progress of the sync.
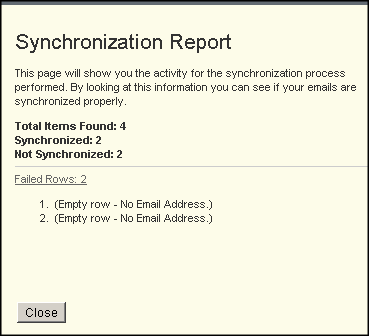
When the sync is complete, you can click a link saying "View Report" to see a basic report of the sync. It will show you the number of subscribers selected for the sync, how many were successfully synced, and how many failed. If any subscribers failed to be imported, you will see a reason explaining why.
This image shows a completed sync:
This image shows a sync report, in which two of the subscribers were not imported due to the 'email' field being left blank:
More questions?
For more information or help regarding Database Sync, please contact our support department and we would be very happy to assist you.