Watch the video tutorial here.
Subscriber fields are custom fields you create to obtain more information from your subscribers. The mailing software, by default, will include fields for Email Address, First Name, and Last Name. Creating your own custom subscriber fields allows you to fine-tune the subscriber experience to your exact needs, while obtaining necessary information to enhance your objectives and goals.
Depending on what type of information you want from your subscribers, you have many different form controls to choose from:
- Text Field
- Text Box
- Checkbox
- Radio Button
- Dropdown
- Hidden Field
- List Box
- Checkbox Group
Here is an example of how each form control appears:
Text Field:
Text Box:
Checkbox:
Radio Button:
Dropdown:
Hidden Field:
(Invisible to viewers)
List Box:
Checkbox Group:
Checkbox 1
Checkbox 2
You can use any combination of these form controls for requesting certain information from your subscribers. Each of these form controls allow custom input, default values, and settings such as required or not.
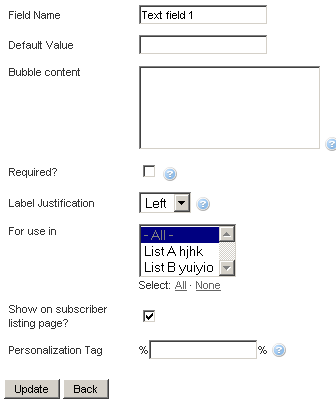
Go to Lists > Manage Subscriber Fields to add or edit fields:

Here is an overview of each of the available settings for a subscriber field:
- Field Name: The internal name of your subscriber field
- Default Value: The value that automatically appears in the field, or selected.
- Bubble content: When a user hovers over this field, text will appear in a box, which can be used to provide further information regarding the fields' purpose.
- Required: When checked, users will be forced to provide a value for this field.
- Label Justification: The label for the field resides either above the actual field, or to it's left.
- For use in: Choose which lists the field will show up for.
- Show on subscriber listing page: When checked, a new column will appear on the Manage Subscribers page, with the fields' name as the column header, and the specific value will show for each subscriber.
- Personalization Tag: This unique text is used to reference this fields' value in various spots, such as in messages or Opt-In/Out confirmations.
Using personalization tags
Whenever you need to reference the values from your subscriber fields in mailings, just include the unique personalization tag where you'd normally include it, if you were manually writing it. The tag will then be dynamically replaced when the mailing is sent, so it's specifically tailored for each subscriber, allowing you to quickly create maililngs using a standard "template," and letting the system fill in the details.
For example, if you have an Opt-In email/SMS confirmation sent for pending subscribers, you can include the subscribers name in the email/SMS message, which is a nice personal touch. Just click the personalization button in the editor toolbar, and select the subscriber field you'd like to include in the message:
This will place the unique personalization tag (%FIRSTNAME%) into the message body:
You can do this for any of the pre-defined personalization tags (First Name, Last Name, etc.), or for your own custom fields. Anywhere you see a message editor - you should see the personalization button in the toolbar.